Friday, February 28, 2014

IP Webcam - Turns your Android Device into a CCTV Camera

0 comments

       IP Webcam


Description
Turns your phone into a network camera with multiple viewing options. View your camera on any platform with VLC player or web browser. Stream video inside WiFi network without internet access.
Use IP Webcam with tinyCam Monitor on another android device or with third-party MJPG software, including video surveillance software, security monitors and most audio players.
Video chat support (e.g. Skype, Chat roulette, only video stream for Windows only via an universal MJPG video streaming driver)
Email me if you have questions after reading the FAQ.

IP Webcam - screenshot


THINGS U NEED

..android phone above 2.3
..computer or laptop (laptop recommended)
..wifi router of one more phone to make wifi hot spot

step-1
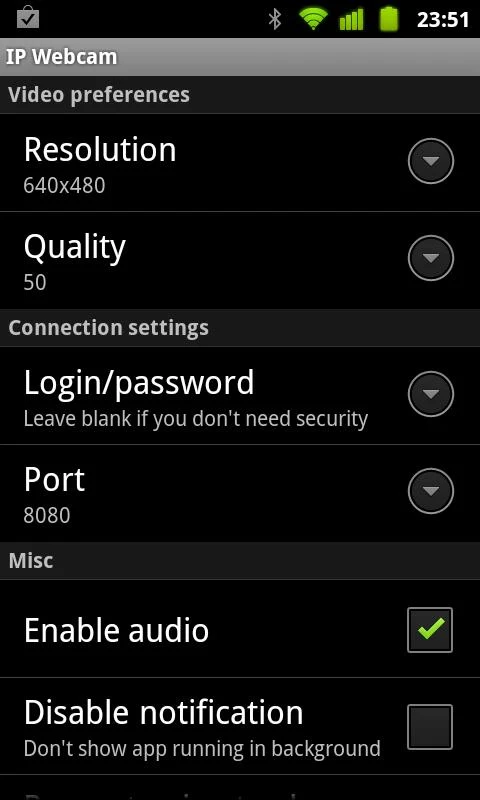
download ip webcam app on your android

step-2
now start ip webcam app on your phone, your camera will also open select start server (option).it will give a assigned ip address to your phone by wifi router or hotspot whatever you are using 

step -3
open web browser chrome is the best it has in built flash player helps in stream videos from the phone enter the assigned ip in the new tab a menu will appear select the broadcast option which is the 5 option .. and its done 


NOTE
ALL YOUR DEVICES PC LAPTOP OR PHONE WILL BE CONNECTED TO SAME WIFI ROUTER 

DONT HAVE WIFI USE WIFI HOTSPOT FROM ANOTHER PHONE AND THE BEST THING NO NEED OF INTERNET CONNECTION USE WIFI JUST LIKE BLUE TOOTH...

enjoy....comment if didn't understand ..


Wednesday, February 26, 2014

Silent-Sense technology allows smartphones to recognize its owner

0 comments

Silent-Sense technology allows smartphones to recognize its owner

Gone are the days of the passwords! US-based scientists from Illinois University have developed a software which recognizes you by your touch. Believe it or not, but the software allows the touchscreen of the device to recognize the user by his way of tapping or swiping the screen of the device. Developer Cheng Bo and his colleagues have named it Silent-Sense. The software is said to have a 99% accuracy rate and would be further worked upon, to unleash its full potential.
So how does it work? Well, the software uses the built-in sensors to monitor the fingertip size, pressure patterns, pressure duration and many similar things. These are stored in the device memory as user signature, which helps it recognize its original user. According to the developers, they would further enhance it by allowing the accelerometer and the gyro sensor to work in tandem with the software.
In the initial stage, Silent-Sense was tested on a group of 100 users. Developers reveal that within 10 taps, the software showed 99% accuracy rate. There is more to the software! It does not check for the user’s identity while running games or apps. It only powers itself while running personal stuff like mails, texts and other sensitive data.


TinEye Reverse Image Search

0 comments

Posted Image


TinEye is a reverse image search engine.

TinEye is a reverse image search engine. It finds out where an image came from, how it is being used, if modified versions of the image exist, or if there is a higher resolution version.


TinEye

TinEye is a reverse image search engine. You can submit an image to TinEye to find out where it came from, how it is being used, if modified versions of the image exist, or to find higher resolution versions.
TinEye is the first image search engine on the web to use image identification technology rather than keywords, metadata or watermarks. It is free to use for non-commercial searching.
TinEye regularly crawls the web for new images, and we also accept contributions of complete online image collections. To date, TinEye has indexed 4,592,041,551 images from the web to help you find what you're looking for. For more information, please see our FAQ, and for some actual TinEye search examples, check out our Cool Searches page.


Get Here


Jpg+FileBinder - software utility to hide files in a picture!

0 comments

Posted Image


Protecting private information against unauthorized access is one of the problems that computer users encounter. In order to solve this issue, you can use various encryption methods, but there are also applications such as Jpg+FileBinder that can help you.

This lightweight tool is simple, yet useful, as it allows you to hide important information in a picture carrier file. Practically, it merges an archive file with a picture, making the output look like an image, when actually it contains the compressed file.

The main advantage it brings you is the ease of use, as you have to follow just a few steps to hide your files. The first one is to choose the image file. JPG and JPEG are the two supported formats.


Posted Image  Posted Image


Then, you have to select the archive file that you want to hide, whether it is ZIP, RAR or 7Z. Just like the input picture file, the output one has to be in JPEG or JPG format.

After you choose all the files, all you have to do is press the 'OK' button and let the program do its magic. A notification message appears when the binding process is done.

The output file acts just like a ordinary picture: it uses the default image viewer to open, it can be previewed and has an image file extension. On the other hand, when you open it with a compression utility, you can view the hidden archive contents.

Jpg+FileBinder is a simple application designed to enhance file security. However, this tool does not encrypt your files and does not restrict the access to them. Anyone can view the archive content if they know the hiding method. Thus, if you want to make sure that your files and folders are secure, you have to consider an encryption utility.


Download the Software Here


LAlarm - Free Laptop Alarm Security Software

0 comments

LAlarm

• Protects laptops and data
• Protects laptop users
Posted Image


How to lock down a laptop to a table

The following procedure locks down a laptop to a table or other immobile object. It requires 1) a USB flash drive and 2) a neck strap (or similar one), which will be used to fasten to the flash drive one end and ties around a table leg or other immobile object the other end. It is useful when you do not have access to a power outlet.
  1. Fasten the strap to the flash drive. (see photo below)
  2. Fasten the other end of the strap to a table or other immobile object.
  3. Plug in the flash drive into a USB port of a laptop.
  4. Lock the laptop by pressing the Windows logo key and L key together.
When a thief removes the laptop from the table, the laptop will be disconnected from the flash drive and then an alarm will go off.
Tips: Instead of using an ordinary neck strap, a USB extension cable can be used to fasten to a table. An advantage is that when the cable is cut off, the theft alarm will also go off.
Fasten the strap to the USB flash drive
Step 1: Fasten the strap to the USB flash drive
Fasten the strap to a table
step 2: Fasten the strap to a table
Plug in the USB flash drive into a USB port of a laptop.
Step 3: Plug in the USB flash drive into a USB port of a laptop.


                    (Video) Theft alarm demo with flash drive


Important:
  • System requirements: Windows 7, Windows Vista, Windows XP,SP2, or SP3. Windows 8 is not supported.
  • Please learn how to properly disarm the theft alarm before installing.
  • For non-English Windows users: LAlarm account lockout function will not work if you are using LAlarm in a non-English Windows. See workaround.
  • Get an alert when a new version is available via RSS feed.


Posted Image


Download the Software Here


DiskPatch - Partition Recovery , Partition Repair and Disk Repair

0 comments

DiskPatch is a professional data recovery utility that recovers data by repairing corrupt disk structures, like the partition tables, 'in-place'.

DiskPatch is designed to tackle the most common issues that prevent you from accessing your data: a corrupt MBR (Master Boot Record), corrupt partition tables, accidentally deleted partitions, corrupt boot sectors, and 'bad' sectors.

Corruption of the MBR, partition tables and boot sectors account for the majority of the problems that lead to 'mass data loss'; situations where an entire drive or partition can't be accessed. 

You can fix these problems yourself by running DiskPatch!
DiskPatch automatically repairs damaged, corrupt or missing partition tables and boot sectors. Fast. Simple. Safe.


DIY DataRecovery DiskPatch: screenshots
The DiskPatch setup includes boot disk builders, so getting started with running DiskPatch is quite easy.

Simply follow the wizard to create a bootable USB disk or a bootable diskette.
Select the appropriate boot disk builder from the DiskPatch program group.
 
The DiskPatch physical disk selection dialog.

Before you can scan, copy or wipe a disk, you always need to select a physical disk first.

For each physical disk the size in sectors, the size in GigaBytes (GB) and the geometry details are displayed.

If a disk was scanned earlier a state file can be loaded.
 
To simplify the selection process DiskPatch will lend you a hand:
> For each partition start positions and sizes are displayed.
> Through a context menu, additional information like the partition's Volume label can be displayed.
> Once you have selected a partition DiskPatch will mark the partitions that can co-exist with that partition, to help you determine what the most likely partition layout was.
 
For each partition found, DiskPatch can display additional properties:
> Which components have been found for that particular partition. The more, the better the chance for recovery;
> A recovery prognosis is determined based on what components were found;
> The partition type and details are automatically determined;
> The Volume Label is particularly useful for identifying partitions.
 
Additional tools are available for power users. These tools may also be employed by the user to perform specific repairs:
> The built-in disk editor allows you to view, edit and patch any disk sector anywhere on your hard disk.
> For partition tables and FAT, FAT32, NTFS boot sectors, templates are available for easy viewing and editing.
 
The partition table editor template simplifies editing partition tables and minimizes the risk of making mistakes.
 
Templates for editing boot sectors (FAT, FAT32 and NTFS) can be used to simplify viewing and editing.
 
All the power you need to get your hands dirty!
View, edit and patch any sector anywhere on the hard disk in raw Hex or ASCII format.
 
Read and/or write errors are a common cause for all kinds of problems, ranging from not being able to open a file to entire disks becoming inaccessible.
Using the surface scan you can detect problem areas and even repair them (sector reallocation).
By running the non-destructive surface scan you can verify that all sectors of the disk can be read from and written to, without losing your data!
You can run surface scans per partition or for the entire disk.
 
Use DiskPatch to do simple boot management:
you can set partitions active/inactive and hide/unhide them.


Download Here


Talkatone - make and receive FREE calls and texts to US , Canada phone numbers

0 comments

     
Talkatone


Description
Turn your Android device into a phone: get a FREE U.S. phone number, make and receive FREE texts and calls to U.S. phone numbers.
Traveling overseas? Take your device with you and call and text US numbers for FREE on WiFi without paying outrageous roaming costs. Call and text for FREE using a WiFi connection or cellular data (3G/4G/LTE).


Product features:
• Get a FREE unique, local U.S. phone number for your Android device
• Get FREE texting with your device to U.S. phone numbers
• Get FREE inbound calls with your device
• Get up to 20 FREE outbound call minutes per month to U.S. phone numbers (with the option to purchase more minutes as needed)
• Get UNLIMITED, FREE Talkatone-to-Talkatone calls and texts anywhere in the world
• Call and text for FREE using WiFi when you don't have cell coverage
• Stop paying too much for cell minutes and text messages
SPECIAL NOTE TO EXISTING TALKATONE FOR GOOGLE VOICE USERS: Talkatone will continue to support Google Voice users until May 15, 2014. After May 15, 2014 Talkatone users will no longer be able to access Google Voice through Talkatone because Google is discontinuing third party access to Google Voice on that date. We encourage all existing Talkatone for Google Voice users to consider switching to the new Talkatone service, the features of which are described above, prior to May 15, 2014 to ensure a seamless and uninterrupted transition. Happy Talking!
More info: www.talkatone.com


iPhone Screenshot 1iPhone Screenshot 2

  • Stop paying for cell minutes, texts & landlines
  • Turn your iPad or iPod touch into a phone
  • Call/Text even in areas with bad cell coverage
  • Call/Text when travelling without paying for expensive international minutes


Get the Site Here


Top 10 Unknown Google Tricks

0 comments

Google is the Proclaimed king among all search engines present on the internet. Among all the web based search engines, Google stands out because of its high speed and simplicity.

Everyone is familiar with the web applications provided by Google. Some of these are the Gmail, Google Drive, Google app store and a lot more. But little do people know about some very handy tricks that come along with this impeccable search engine.

 Top 10 Unknown Google tricks of all times:


1. Definition: there is no longer the need to type a word and then visit dictionaries online to find its meaning. Using this trick, all you need to do is simply write “define” followed by the word whose meaning you want to know.
You will be amazed to see that the meaning of the word, along with its synonym and antonym will be displayed on the search engine. For instance, type “define reach” and then press enter. The meaning of the word will get displayed on your screen.

2. Phone number lookup: it is now possible to trace mobile number by simply typing the full number along with the area code. This will display the address as well as the name of the person under whose name the number is registered.

3.Local search: you can now find local restaurants and other landmarks with this trick. Simply go to “Google visit” and type the name of the area and the place which you want to find. It is capable of displaying all local landmarks and places.

4.Translate: the “Google language tool” comes very handy while translating text, words, a fully fledged web page or document on the internet.

 5.Find movies and weather: All you need to do is type “movies” or “weather” in the search box followed by the area code or name of the state in order to display corresponding information regarding it. For instance, if you type “weather 12345”, weather conditions of the corresponding location will be displayed. Also, on typing “movies 12345”, the details of all the movies currently running at that place along with number of shows will get displayed.

 6.Paged linked to you: You can now find the web pages and links that are connected with your blog or website. Simply type “link” followed by the URL of your website and you will get a list of all the pages connected with your website.

7.Tracking airline flights and packages: this is another handy trick. You can now find the arrival time and status of a flight by simply entering the name of the airline and corresponding flight number.

8.Calculator: you can use the Google search engine as a real time calculator as well. For instance, if you will type 25+25 in the search box, 50 will get displayed.

9.Stocks: all you need to do is type the stock symbol on Google and you will get information about stock rates, links as well as charts. For instance, to know about the stock details of “Microsoft”, you have to write “msft” on Google.

10.Finding PDF results only: to get results matching only a certain file type, simply type “fileType:” after your search. Online manuals can be found using this trick from Google.
With this it ends my list of Unknown Google tricks, If i am Missing out on any Useful Trick then please feel free to Comment.

Monday, February 24, 2014

"SteamOS" An Ultimate Operating System for Gamer's

0 comments

AN OS FULLY DESIGNED FOR GAMERS 

SteamOS  is a Debian GNU/Linux-based operating system in development by Valve Corporation designed to be the primary operating system for the Steam Machine game consoles.And it is designed primarily for playing video games. Users will be able to stream games from their Windows or Mac computers to one running SteamOS, and it will incorporate the same family sharing and restrictions as Steam on the desktop. Valve claims that it has "achieved significant performance increases in graphics processing" through SteamOS. The operating system is open source allowing anyone to build on or adapt the source code.


Since SteamOS is designed for playing games it does not have many built-in functions beyond web browsing and playing games; for example there is no file manager or image viewer installed by default. Users can, however, install other software by using the inbuilt GNOME desktop environment. Though the OS does not, in its current form, support streaming services, Valve is in talks with streaming companies to bring the feature to SteamOS. The OS does not currently support AMD or Intel graphics cards and so requires an Nvidia one.


What are the SteamOS Hardware Requirements?
Processor: Intel or AMD 64-bit capable processor 
Memory: 4GB or more RAM 
Hard Drive: 500GB or larger disk 
Video Card: NVIDIA graphics card
(AMD and Intel graphics support coming soon!) 
Additional: UEFI boot support
USB port for installation 


 The next question will be how you can install it in your computer Right . there  are two methods for installation, but both will erase entire your hard disk ,so you have to take care aboout that,


Default Installation

You will need to create a SteamOS System Restore USB stick to perform this install. The image provided here requires at least a 1TB disk.

1.Download the default SteamOS beta installation(http://store.steampowered.com/steamos/download/?ver=default)

2.Format a 4GB or larger USB stick with the FAT32 filesystem. Use "SYSRESTORE" as the partition name.
3.Unzip the contents of SYSRESTORE.zip to this USB stick to create the System Restore USB stick.
4.Put the System Restore USB stick in your target machine. Boot your machine and tell the BIOS to boot off the stick. (usually something like F8, F11 or F12 will bring up the BIOS boot menu).
5.Make sure you select the UEFI entry, it may look something like "UEFI: Patriot Memory PMAP". If there is no UEFI entry, you may need to enable UEFI support in your BIOS setup.
6.Select "Restore Entire Disk" from the GRUB menu.
7.When it is complete it will shutdown. Power on the machine to boot into your freshly re-imaged SteamOS.

Custom Installation

The second method is based on the Debian Installer. It requires multiple configuration steps:

1.Download the custom SteamOS beta installation(http://store.steampowered.com/steamos/download/?ver=default)

2.Unzip the SteamOS.zip file to a blank, FAT32-formatted USB stick.
3.Put the USB stick in your target machine. Boot your machine and tell the BIOS to boot off the stick. (usually something like F8, F11, or F12 will bring up the BIOS boot menu).
4.Make sure you select the UEFI entry, it may look something like "UEFI: Patriot Memory PMAP". If there is no UEFI entry, you may need to enable UEFI support in your BIOS setup.
5.Selected "Automated install" from the menu.
6.The rest of the installation is unattended and will repartition the drive and install SteamOS.
7.After installation is complete, log onto the resulting system (using the Gnome session) with the predefined "steam" account. The password is "steam". Run steam, accept the EULA, and let it bootstrap. Logoff the steam account.
8.Log on with the "desktop" account. The password is "desktop".
9.From a terminal window, run ~/post_logon.sh. This will prompt for a password - enter "desktop". This script will perform the post-install customizations, delete itself, then reboot into the recovery partition capture utility.
10.Confirm "y" to continue and the recovery partition will be created. When it is finished, reboot into your freshly installed SteamOS.


Now you can start,you are powered with steam, YOUR WAR BEGINS HERE


Thanks for coming by and taking your time to read this post :) I hope you have learnt something today. Now I'd love to hear from you. Got any views, thoughts and questions related to the post? I'm all ears here. Add your comment.


‘ Paper ‘ the Best Facebook App ever seen

0 comments

facebook has released their new iphone app called Paper to redefine the current newspaper trends . This app is now available from Apple’s App.if you are an facebook user from your iphone you should experience this app.because this is not a side project of facebook like messenger or other services .Facebook worked much hard for developing this app .
Paper’s Facebook feed is just a better-looking, more responsive version of what you’ll find inside the company’s main app. Every other section is a mix of recent and popular posts from the profile pages of Facebook's favorite publishers, curated by a small (and powerful) editorial team within the company. In Headlines, for example, you'll find posts from Time, the AP, The New York Times, Politico, and etc In Cute, you'll find a range of more curated posts from the likes of Grumpy Cat, Laughing Squid, and Zooey Deschanel's site HelloGiggle

fb2

  facebook  implemented fully revised new interface for this app.it really does dispense with much of the stuff that associate with Facebook like companies trade mark and blue trim color  etc.now everything is cleaner with a large content panel on the top and smaller horizontally – scrolling ones on the bottom, lots of big images and wonder full fluid animation effects are also enclosed in this app which gives entirely new reading passion to readers.Everything from swipes to pinch-and-zooms respond instantaneously and naturally, and images load quickly.

fb1

there is a big panel on the top and browsable smaller one below.even though the app still displays articles by giving you the same view you’d seen if you simply visited the site where it was published it shows in a less cramped full screen mode which makes for easier reading .and it provides options for saving and sharing news with your friends and all.
so why you are waiting download it now its self .
https://www.facebook.com/paper


Thanks for coming by and taking your time to read this post :) I hope you have learnt something today. Now I'd love to hear from you. Got any views, thoughts and questions related to the post? I'm all ears here. Add your comment.


How To Create your Own Run Commands in Windows

0 comments

There is no doubt that Microsoft Windows is the most widely used operating system in all parts of the world. Apart from being simple to use, it is quite rich in features as well, which makes our lives quite easy.
The Run command available on Windows operating system is one such power packed feature that lets you to open a document or an application instantly with the help of just 1 command. So, rather than clicking several icons or using multiple commands, you can use the Run command to open any program or document instantly. For that you will need to Create Run Commands for any software of your Choice which you use Frequently.
Create Run CommandsBut, do you know how to Create Run Commands of your Own? Well, it is really easy, which involves just few steps. Through this article, I will help you understand how to access your favorite applications by creating custom Run commands.

Open Run Command:

Before I show you how to create your own Run commands, let’s take a quick look on how to open Run Command. First of all, you need to open the Run window by just pressing the Windows Key along with the R key, i.e. Windows + R. Now, you have to type the name of the program that you desire to open up or execute. Unfortunately, not all programs can be accessed through this method. So, let me show you how to create Run commands that do not come as inbuilt commands.

Steps to Create run commands of your own


Step 1. The first step is to select the software or application for which you want to make custom Run command. For example, let us consider Google Chrome as the example here. Remember, you can choose any application other than which is already there in the Run command.

Increase battery life of your laptop - How to Guide

0 comments

Every laptop or Netbook user these days have the same headache of limited backup time of batteries. As far as your system is new , you will have a good backup time but when it becomes a few months old you will definitely face problem of limited battery life.
So here I am giving you a solution to Increase battery life of your laptop up to a sufficient extent.
There is an inbuilt command in your computer to Increase battery life as well as the performance of the system but not all users are aware of it. Some laptops directly provide an interface with option termed as “ POWER SAVING MODE ” but  if your laptop is old or don’t have this feature by default , you need not to worry because you can do the same task manually.
If you have a laptop with Windows 7 installed, you can use the ‘powercfg‘ command . It will display useful information about your laptop’s energy consumption and usage. If  you can understand and maintain  it correctly then you can extend your Battery life and performance by great amount.

Steps Increase battery life of your laptop


Step 1: Click on the Start Menu and type “ CMD ” in the Start Search bar.
Step 2: The search will start and it will then display an icon of “ CMD ” . simply right click on it and select Run as administrator.
Step 3: It will open command line, now simply run the command “powercfg -energy” without quotes. (For windows 7users.)
Windows 8 users can Simply run the command “powercfg /energy” without quotes.
Step 4: Now Press “Enter”.
Once you successfully execute this command , Windows  will run a complete scan of  your system and it will find some ways to improve performance and power efficiency.
The results of this process will be saved to an HTML file, which is commonly  present  in the “System32” folder of most of the systems.
To access this file, simply follow the path which will be displayed in command prompt window after completion of the command. Read This file to understand that what program in your system is consuming more power and degrading the performance. Fix the Problem to Increase battery life of your laptop.

Some More Useful Tips to Increase battery life


  • Eject or Remove External Devices like Pendrive/DVDs/External HDD if not in Use
  • Run Apps that don’t Eat up much RAM
  • Disable Bluetooth of your Laptop if not in use.
  • Reduce Screen Brightness, This takes away lot of your battery, Reducing Brightness will help
  • Turn of Internet if you are not using it.
  • Make sure your Laptop’s Temperature remains Low
I am quite sure Performing these Tasks will help you to Increase battery life of your laptop.