Showing posts with label Android Tricks. Show all posts

Thursday, March 20, 2014

How To Fix Insufficient Storage Available Error On Android Through Installing Apps or Moving Installed Applications To External SD Card

0 comments


The insufficient storage available bug on android is for many people a nuisance. It is a widespread problem among many android users who experience the problem with their devices. It mostly occurs whenever an android user is about to install some apps. The error message ‘Insufficient Storage Available’ will suddenly appear. This is a very common problem with the Android OS since all apps, by default are installed in your phone memory. Coincidentally, the memory on android phones is not very large.
Many have tried every possible trick and tutorial on how to fix insufficient storage available error on android phones with mixed results. Android devices that have been rooted are more likely to give this error, especially when downloading, installing and testing apps. Before embarking on the steps on how to fix insufficient storage available error on android phones, an android user must be in a position to differentiate between the real message and the bug. The real message only occurs when storage is below 15MB which is the threshold which android limits any installation of apps.


How to Use ADB ( Android Debug Bridge ) Method to Install apps or Move installed applications to SD Card on your Android phone


These are the steps of ADB method:

(1) Download and install JDK ( Java Development Kit ) . Skip this step if JDK (Java Development Kit) is already installed on your Windows OS.

(2) Download and install Android SDK . It is very important that the installation path must be “C:\android” to avoid any confusion.

(3) Download & install SAMSUNG USB DRIVERS

2. Uninstall previous version & reboot
3. Install New Drivers & reboot system


(4) Run Android SDK Manager by going to “Start Menu > Programs > Android SDK Tools > SDK Manager”.
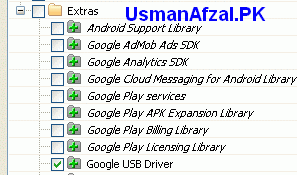
Select the packages like Android SDK ToolsAndroid SDK Platform-tools and Google USB Driver Package and click “Install Packages” button.
android sdk1a2
android sdk1a3
android sdk1a4
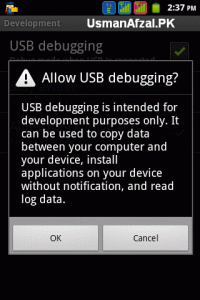
(5) On your Android device, go to Menu > Settings > Applications > Development > USB debugging (check: ON). Select Allow USB debugging : OK.
USB debugging mode
Now connect your mobile to PC via USB cable.


(a) Run Command prompt by going to Start Menu > Run
Run cmd
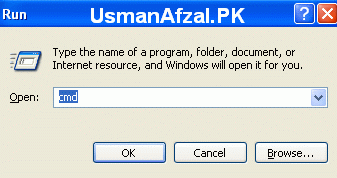
(b) Write cmd and press OK. The command prompt window will open.
Command prompt
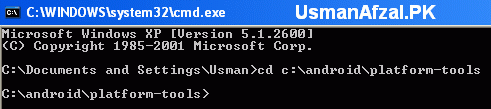
(c) Type cd C:\android\platform-tools and press ENTER key.
ADB devices
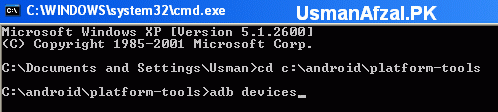
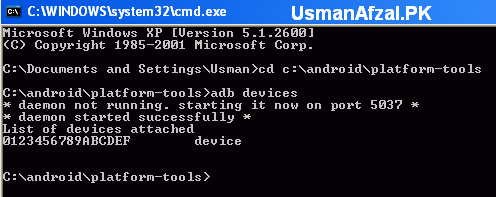
(d) Run command adb devices and press ENTER.
ADB devices
This will show the list of all devices attached.
ADB devices attached
(e) Run the following command to check the install location of your Android device:
Command # 1:
adb shell pm getInstallLocation
or adb shell pm get-install-location (for ICS versions)
command 1
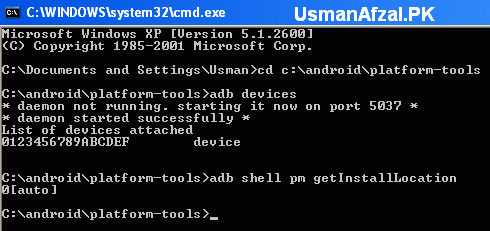
The output will be 0[auto] by default. Below are the options you have:
0[auto] : Installation to auto location decided by Android OS
1[internal] : Installation to internal storage of mobile
2[external] : Installation to external media like SD Card
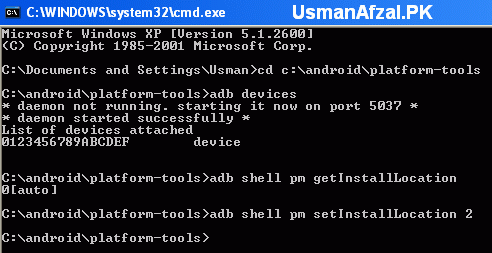
To set SD Card as default install location, run this command:
Command # 2:
adb shell pm setInstallLocation 2
or adb shell pm set-install-location 2 (for ICS versions)
command 2
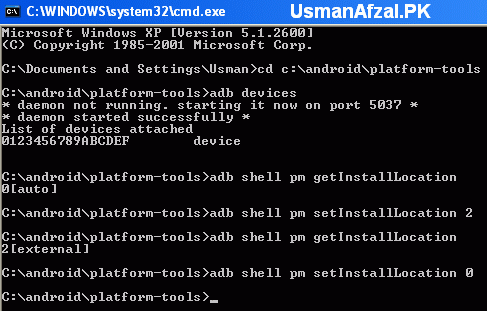
To verify that above command worked correctly, you can run Command # 1 again.
verify command 1
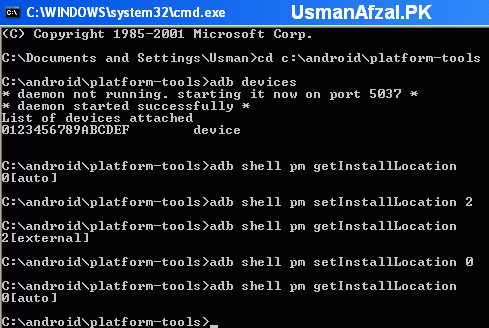
To change the install location to 0[auto] again, run this command:
Command # 3:
adb shell pm setInstallLocation 0
or adb shell pm set-install-location 0 (for ICS versions)
command 3
Run Command # 1 again to verify the install location:
verify install location
You can simply unplug your mobile from PC after setting install location to SD Card. Finally, go to the phone and disable USB debugging and close the command prompt.
You have now successfully completed how to fix insufficient storage available error on android phones in easy to follow steps. You can enjoy the experience the android phone will give you especially with the numerous apps made available for android.


Thanks for coming by and taking your time to read this post :) I hope you have learnt something today and shared this. Now I'd love to hear from you. Got any views, thoughts and questions related to the post? I'm all ears here. Add your comment.

Sunday, March 16, 2014

Kochadaiiyaan:Reign of Arrows - The Game for Android

0 comments
                                                                                                     
Cover art                                                                                 


Kochadaiiyaan:Reign of Arrows


Description
Vroovy Studios (a collaboration between Gameshastra and Hungama) in association with Mediaone Entertainment are proud to present the official game on the Tamil movie ‘Kochadaiiyaan the Legend ‘ (Directed by Soundarya Rajinikanth Ashwin , starring Superstar Rajinikanth and Deepika Padukone )– the most awaited movie of 2014 titled ‘Kochadaiiyaan the Legend: Reign of Arrows’.
The game is based on the main character “Kochadaiiyaan” , a historical character who lived during 710 AD as one of the royal guards of the then Pandyan king celebrated for his dominance over the Cholas and Cheras.
It is a third-person, action arcade archery game in which the player gets a chance to step into the shoes of Superstar Rajinikanth as Kochadaiiyaan & single-handedly push out an invading army out of the prosperous city of Kottaipattinam which is under siege .The game works on a cover based system where the character can only traverse from one cover to the next by the press of a button.
In this game the player will dart from cover to cover and shoot arrows at enemies placed within the game’s respective environments. The game will consist of linear levels with visually changing environments. There will also be power-ups by the likes of – Split shot, Explosive arrows and Rapid Fire. The game also features Battle Support powers like – Reign of Arrows and Catapult bombardment which will make for an interesting variety of arsenal.
Some other features of the game are:
• Stunning Environments to play ,catering to your craving for Medieval aged arcade game
• An option to upgrade to advance armor & weapons
• Reign hell on enemies with power ups like Reign of Arrows & catapult bombardment.
• Refill your arrows at arrow depots.
So, what are you waiting for??
Grab your smartphone and download the game now, because this is your chance to be in the shoes of the great Rajinikanth – a totally unmatched experience altogether.

Kochadaiiyaan:Reign of Arrows - screenshot

Kochadaiiyaan:Reign of Arrows - screenshot

Kochadaiiyaan:Reign of Arrows - screenshot

Kochadaiiyaan:Reign of Arrows - screenshot

Kochadaiiyaan:Reign of Arrows - screenshot

Kochadaiiyaan:Reign of Arrows - screenshot


Download


Thanks for coming by and taking your time to read this post :) I hope you have learnt something today and shared this. Now I'd love to hear from you. Got any views, thoughts and questions related to the post? I'm all ears here. Add your comment.


Friday, March 14, 2014

Kochadaiiyaan:Kingdom Run - The Game for Android

0 comments

Description
Based on the much awaited Tamil movie of 2014, Kochadaiiyaan - The Legend ( starring Superstar Rajinikanth and Deepika Padukone ) , Vroovy (a Gameshastra and Hungama collaboration) and Mediaone Entertainment feel proud to present Kochadaiiyaan -Kingdom Run. It is a side scroller, action arcade game allowing you to step into the shoes of Kochadaiyaan and take on an entire army. The entire game focuses on the reflex of the player. Throughout most of the game, the player’s objective is to traverse the paths by avoiding traps, jumping from platform to platform and making well timed leaps to progress.
The game is encapsulated with brilliant environments viz – Jungle, Port, Battlement and Castle . Each and every level is constructed in such a way that the player needs to be more agile in order to make it through. The variety of levels keeps the player on edge and the game play fresh. To add to the adrenaline rush that the game creates, one can upgrade to a variety of weapons and armor from the arsenal. The ever changing look and feel of the levels makes it a great experience.
Some of the features of the game are:
• Four Stunning Environments to play, catering to your craving for Medieval aged arcade game.
• Option to upgrade to advance armor and weapons
• Exciting Power ups like Sacrificer and Invincibility to keep you going.
• A mix of combos allowing you to enjoy the ultimate thrill of an arcade game.
So, what are you waiting for??
Grab your smartphone and download the game now, because this is your chance to be in the shoes of Great Rajnikanth as Kochadaiyaan and enjoy a totally unmatched experience altogether.


Posted Image

Posted Image

Posted Image

Posted Image


-----------------------------------------------------------------------------------------------------------------------
Download
----------------------------------------------------------------------------------------------------------------------- 


Watch Live Streaming of Cricket Matches Online on your Android Device

0 comments

Cover art         


Live Cricket


Description
*** Watch Asia Cup Live
*** Number 1 live cricket application all around the world
*** Now Watch Live streaming of cricket matches on your mobile.
*** Display Top Test, ODI and T-20 most updated ranking and points.
*** Keep updated with live score card of matches.


Live Cricket - screenshot   Live Cricket - screenshot

Please note: 
1: Flash Player is required to watch live matches, please follow this link to install the flash player for your android device
http://phonegadgetz.blogspot.com/2014/03/how-do-i-manually-install-flash-player.html
2: Javascript must be enabled for your browser for this application and Plug-ins are set to Always on.
3: For live streaming we are dependent on different servers, so due to heavy load on those server, streaming may stop some times.
4: Streaming works during the live matches.

Live Cricket - screenshot   Live Cricket - screenshot


How do I manually install Flash Player on my Android device?

0 comments

 Flash Player for Android is no longer available for download from the Google Play app store, but Android users can still download and install Flash Player from the Archived Flash Player Versions page on the Adobe website.  To do so, please watch this instructional video or follow the steps below:


If you are encountering problems using Flash Player, please click here for an HTML5 version of this video: YouTube HTML5 HD Link


  1. Make sure your Android device is connected to the Internet.
  2. Open the Settings menu.
  3. Select Security (or Applications, on older Android OSs).
  4. Place a checkmark next to the "Unknown sources" check box.
  5. Tap OK to confirm your selection.
  6. Close Settings.
  7. Launch the browser.
  8. Search for "flash player archive page" or navigate directly to http://helpx.adobe.com/flash-player/kb/archived-flash-player-versions. html
  9. On the Archive page, scroll down to "Flash Player for Android archives"
  10. Select a version of Flash Player that is compatible with your Android operating system.
  11. Tap the link to download the Flash Player installer. Download begins automatically.
  12. When download completes, close the browser.
  13. Open Notifications.
  14. Tap "install_flash_player.apk"
  15. When prompted, tap Install.
  16. When installation is finished, tap Done.


Truecaller - Caller ID , see who is calling

0 comments

Truecaller search feature  

SEARCH

Search Numbers and Names

Searching for any number or name becomes easy with Truecaller. You can find businesses, financial institutions, or friends in the Truecaller community easily through the search function. Truecaller users will be notified when someone requests their number, and have the option to approve any request that comes through.

Truecaller caller id feature  

CALLER ID

See Who's calling

Help guard your most personal accessory, your mobile phone, by instantly knowing who is calling before you pick up. Truecaller gives you the knowledge of who is trying to get in touch with you even if the number is landline, mobile or pre-paid.

Truecaller block feature   

SPAM BLOCKER

Never pick up an unwanted call

Truecaller gives you immediate access to an expansive list of top spammers, allowing you to quickly block calls from all numbers reported as spam. Truecaller users work hard to crowdsource information and report spammers in order to make the entire Truecaller community smarter!

Truecaller update phone book feature  

SOCIAL SYNC

Add pictures and contact information

You can easily keep your contact list updated with friends' profile pictures and status updates by choosing to source information from popular sites like Facebook, LinkedIn, and Twitter.


Download now

Find phone numbers, connect with people and make your phonebook beautiful.


i A W S B

Friday, February 28, 2014

IP Webcam - Turns your Android Device into a CCTV Camera

0 comments

       IP Webcam


Description
Turns your phone into a network camera with multiple viewing options. View your camera on any platform with VLC player or web browser. Stream video inside WiFi network without internet access.
Use IP Webcam with tinyCam Monitor on another android device or with third-party MJPG software, including video surveillance software, security monitors and most audio players.
Video chat support (e.g. Skype, Chat roulette, only video stream for Windows only via an universal MJPG video streaming driver)
Email me if you have questions after reading the FAQ.

IP Webcam - screenshot


THINGS U NEED

..android phone above 2.3
..computer or laptop (laptop recommended)
..wifi router of one more phone to make wifi hot spot

step-1
download ip webcam app on your android

step-2
now start ip webcam app on your phone, your camera will also open select start server (option).it will give a assigned ip address to your phone by wifi router or hotspot whatever you are using 

step -3
open web browser chrome is the best it has in built flash player helps in stream videos from the phone enter the assigned ip in the new tab a menu will appear select the broadcast option which is the 5 option .. and its done 


NOTE
ALL YOUR DEVICES PC LAPTOP OR PHONE WILL BE CONNECTED TO SAME WIFI ROUTER 

DONT HAVE WIFI USE WIFI HOTSPOT FROM ANOTHER PHONE AND THE BEST THING NO NEED OF INTERNET CONNECTION USE WIFI JUST LIKE BLUE TOOTH...

enjoy....comment if didn't understand ..


Thursday, February 20, 2014

How to Hide Last Seen Status on Whatsapp

0 comments

Whatsapp is used by almost everyone who owns a smartphone today. The reason behind its success is simplicity of app and number of features provided by it. It is an instant messaging application which has now updated with time and able to send and receive voice messages as well. Apart from just voice and text messages it is capable of sharing multimedia files like videos , images , songs etc. Because of these features Whatsapp has became much popular.

But it also has a feature which irritates many users i .e. LAST SEEN. So here i will tell you a trick to escape from the time stamp of whatsapp's Last seen feature.


Hide Last Seen In iphone :

In iphone there is a default setting to enable and disable the last seen timestamp of whatsapp messenger which makes it much more easier to hide your last seen status on whatsapp and you dont need to download and install any third party application to hide your last seen status from others.

All you need to do it to upgrade your application to latest version available because the latest update of Whatsapp for Iphone have “Last Seen Timestamp” option. So simply go Settings>> Advanced>>Last Seen Timestamp and turn it OFF.


Hide Last seen in Android :

If you are an Android OS user then there are two methods by which you can hide your last seen status. But they really seems nothing as compared to the above mentioned feature of iphone. But still if you want to get rid of this last seen time stamp you must follow one of these methods.

METHOD 1 - USING NOT LAST SEEN APP :


This is an app of android which disables the network packet data when you wish to hide your last seen status. But the drawback of app is that you can not hide your status while you wish to chat with someone for long time.

Because this app basically disconnects your handset from packet data when you enter whatsapp, so servers of whatsapp dont get your status that you are using it and then after reading the messages when you close the whatsapp , it again enables the internet active automatically so in this way you get to read the messages from your contacts without being noticed by whatsapp servers and hence your last seen status is not updated.

You can download Not last seen app for your android phone from here : DOWNLOAD


METHOD 2 - MANUALLY


1. Go to settings and Disable your cellphone’s Interent and Wifi.
2. Open Whatsapp. Read and send messages.
3. Close Whatsapp, now enable Internet and Wifi. 

As soon as the Internet connectivity re-initialized , Whatsapp will synchronize with the servers and the messages will be sent without the server getting to know your last online status update.

Unfortunately for our Blackberry and Windows phone users, there is no such method other than Manual at this moment. However in the past, Blackberry had an app known as OpenWhatsapp for hiding Last Seen, but it has been discontinued by its developers. But stay tuned, we will find some trick for these two very soon.


Wednesday, January 22, 2014

How to Run Android Apps on a PC Using Bluestacks

0 comments


BlueStacks App Player is a versatile program that bridges the gap between mobile and desktop by allowing users to run their favorite Android apps on their Windows or Mac OS X devices. An innovative "Cloud Connect" feature allows you to push apps from your Android device to Bluestacks, and vice versa. First released to the public in 2011, the program has continued to grow, and is currently free for download in its current beta form. Want to get a taste of Android on your desktop? Here's how to set up BlueStacks, as well as a rundown of some of its controls and interesting features.

1. Installing BlueStacks

BlueStacks App Player is available for Windows and OSX computers, and is a quick, compact install to your boot drive (there's no option in the installer to go to a different drive or directory). The only choice you make during the install is whether to allow the program to make notifications, as well as the option to opt in to BlueStacks Spotlight, which holds daily app giveaways.

2. The Home Screen

Once installed, BlueStacks will boot up to its Home Screen, where you can access your installed apps, look up apps in the "Top Charts," search for apps, and access settings. You can use the mouse for basic touch controls here, with clicking and holding to simulate basic tap and swipe controls. From here, we'll need to do a bit more setup before you can get around to installing apps. You'll need to set up access to the Google Play store and associate a Google Account with BlueStacks.

3. Setting up the App Store

With BlueStacks installed, the first thing you'll want to do is associate a Google Account so that you can get onto the Google Play store and download apps. Go to "My Apps" and click on "1-Click Sync Setup," which will bring up a wizard interface that will guide you through the process. Basically, you'll need to either create a Google account, or sign in with your existing one.

4. Setting up BlueStacks Cloud Connect

An optional step for users with an Android smartphone or tablet is to set up BlueStacks Cloud Connect, an app that allows you to push apps from your Android device to BlueStacks, and vice versa. Download Cloud Connect for your Android device, and then go to the Settings button on BlueStacks and click on "Cloud Connect".
If you have an Android phone, input an email address as well as your phone number. You will then receive instructions via email and SMS on how to connect your phone to Bluestacks, push apps, and sync SMS.
If you're running an Android tablet, you instead just use an email address to synch BlueStacks with your device. After registering BlueStacks Cloud Connect, you should receive an email containing a PIN number, which you input into the Cloud Connect app.
You should now be able to push apps between your device and BlueStacks. You're essentially istalling the same app on your desktop and mobile device, without syncing app data (such as login credentials or game progress). Still, it's an easy way to copy apps from your device to BlueStacks, or vice versa.

5. Installing & Running Apps

If you're not going to sync apps to and from your Android device, you can just use the built in App Search to search for and install apps from Google Play, Amazon, or 1Mobile.
It may seem confusing at first, but BlueStacks won't let you get to its three built-in app markets directly. You'll need to go through the App Search button. Type in the name of the app you're looking for, and it will search 1Mobile, Amazon, and Google Play for matches, and give you the option to install apps from any of the above three stores.
Once you've accessed one of the three app stores, you can then navigate that store. Within Google Play, for instance, you can take advantage of the store's search and other features.
Once you return to the Home Screen, your newly installed app should be ready to run. BlueStacks can run an impressive variety of apps from social networking tools and multimedia apps to games. However, BlueStacks won't run everything, so expect a little trial and error for compatibility.

6. Controls & Settings

You should now have everything you need to install and run apps from BlueStacks, so we'll finish up with some extra notes on in-app controls, as well as settings. Unless you happen to be running a touchscreen rig or a Windows 8 tablet, you're going to need some way to approximate pinch to zoom, as well as tilt controls.
Pinch to Zoom: Control +, or Control -
Tilt Controls: 'Z' or 'X' can be used to simulate tilting a device left or right.
BlueStacks supports the use of gamepad controls for many apps, which will be a godsend for users looking to play Android games on a PC. Plug in your controller, and Bluestacks should inform you if a particular app supports a controller.
Finally, the Settings menu (gear icon) contains assorted system settings for language, keyboard settings, contacts and account management, and an app manager for uninstalling applications and setting their default sizes.
There's your quick visual tour of the BlueStacks App Player. It may not run every Android app perfectly, but BlueStacks puts you just a mouse click away from thousands of compelling choices.


You like the Post?  Then Please Share it...