Monday, February 3, 2014

How to reset Windows 7/Vista/XP/2000 admin password easily

0 comments

It must make you distraught after you can't login Windows Pc. It would make me crazy if I were you, since there are actually a lot of crucial files on the pc. There is nothing worse than lost Windows password or forgotten Windows password. Fortunately there are lots of online Windows password reset program tools that may help you, if you want to pay or wait for them to remove Windows password. Instead, this short article will show you how to reset your Windows 7/XP/Vista password within moments. In this article I will introduce two key strategies to resolve the problem of how to reset windows password and how to bypass Administrator password easily:

1.Burn a bootable Ophcrack reset disk to change Windows password

It istruly is free Windows password reset and recovery computer software based on rainbow tables. It may perform on Windows, Linux/Unix, Mac OS X- It is freeand easy to use, so it is one of the most well-known Windows password reset tool. To change Windows password, you need to do 2 actions:


(1) Download Ophcrack from sourceforge.net , run USBOphcrack.exe , extract for your Pc; then click USBOphcrack.bat out of your USBOphcrack folder, and stick to directions; then reboot your Laptop or computer and set bios to boot from USB.


(2) Booting from the USB sticks into a mini Linux setting. Ophcrack is launched after the technique has booted. You may finish resetting the forgottenWindows 7 Passwords operating with this single USB instrument.


2.Super Windows Password Reset software- The easiest way to reset Windows password

Super Windows Password Reset is a Windows password reset computer software to reset forgotten Windows Administrator passwords and other users' password; it can reset Windows passwords on all Windows family members. The factors you should do are burn this Windows 7 password recovery software onto a blank and bootable CD/DVD/USB flash drive, and use this password reset disk to reset forgotten Windows 7 password. This Windows password reset method is simple and this is the easiest strategy to reset forgotten Windows password. Beneath is a guide of how bypass Windows password with three steps:


(1) You can free to download Super Windows Password Reset from the official web page: http://www.passwordreset.biz/ ; install and run; a blank CD/DVD/USB flash drive is necessary.


(2) Burn the Windows password reset disk
Here we take Burn DVDCD Disc for instance.
Click "Burn DVDCD Disk"; double click on Burn_CD.exe to run "Burn CD"; then click "Browse"; choose SWPR.iso file; click "Start"; then the CD Drawer open up; it's going to ask you insert a blank CD-R disc into the drive; click "OK"; Windows password reset disk making function is done now.


(3) Insert the created Windows password reset disk into the laptop or computer which you lost Windows password; set bios, which is, set your computer system boot from CD/DVD. Adhere to the step by step wizard to get rid of Windows 7 password.


There are various methods to reset Windows 7 password, the above two methods are easier way, one is freeware and the other one needs to buy. Both need to create Windows password reset disk; and they're able to reset any Windows users' password, but we do suggest you choose the second way after you forgotten Windows 7 password, because it is actually a lot more stable than another one and you would not lose any information with this Windows password reset software. It's not only use for Windows 7 OS but use for all Windows family members. In fact, the 2 methods of Windows password recovery can use for all Windows family password reset, you may bypass Windows XP password and reset Windows Vista password in the same way. 


You like the Post?  Then Please Share it...


Email Forge, sends email from anyone

0 comments

1. Some ISP's block port 25 so it might not work
2. Most likely, you won't be able to see what yer typing


First of all, you need an SMTP server. These are extremely common and, in fact, I'll provide one for you (mail.hotmail.com). SMTP: Simple Mail Transfer Protocol. This service runs on port 25 (in most cases) and is used to send outgoing email.


Now, open up the command prompt and telnet to mail.hotmail.com on port 25 (note: to see what you type, type telnet and enter then type in set local_echo):


code:--------------------------------------------------------------------------------
telnet mail.hotmail.com 25
--------------------------------------------------------------------------------


When yer connected type in (except what's in between *'s; you chose what will go in the []):


code:--------------------------------------------------------------------------------
helo
*wait*
mail from:[whoever]@[whoever.com]
*wait*
rcpt to:[whoever]@[whoever.com]
*wait*
data
*wait*
[write]
[whatever you want]
[in]
[as many]
[lines as wished]
.
*wait*
quit
--------------------------------------------------------------------------------


Helo is just a handshake with the server. Mail from: is FROM who you want the email to be. rcpt to: is who you want the email to go to. under data is what you want sent. the '.' ends data. quit quits. There! simple isn't it. 


You like the Post?  Then Please Share it...


How to Create Your Own Character ( Font ) With Windows Bult-in Utility

0 comments

Windows has a utility known as Private Character Editor which allow as to create character.
Posted Image

Step 1
To run Private character editor, go to Start>Run and type the following:


%systemroot%\system32\eudcedit.exe

or simply type

eudcedit.exe


Private character editor will open , inchoose any of the blank box and click OK.
Posted Image

Step 2
You’ll be welcomed in Edit window with a grid measuring 50 X 50. Each character that you draw becomes a black and white bitmap (*.bmp) .The drawing art board is simple enough to understand, but it needs some tricky art to draw a character in it. Use the left mouse button to draw in black and the right one to erase it. You can choose several tools from Tools menu, also you can rotate it.

Posted Image

Step 3.
To Save go to Edit>Save Character or Ctrl+S

Posted Image

Step 4
Now to go Character Map , Start>All programs>Accessories>System Tools>Character Map

Posted Image

Step 5
In Character Map select font type as All Fonts (Private Character) . And then select the created character , after that click copy..

Posted Image

Step 6
Now paste it notepad , wordpad etc....

Posted Image


You like the Post?  Then Please Share it...


Saturday, February 1, 2014

How to Fix USB Device Not Recognized in Windows

0 comments


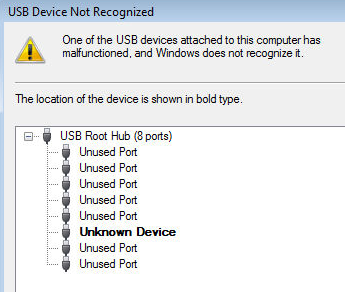
Are you getting a “USB device not recognized” error whenever you plug in a USB mouse, keyboard, or other USB device? I love USB and have 5 ports on my computer so that I can connect my mouse, keyboard, camera, phone, and printer to it all at once!
However, last weekend, my computer stopped recognizing my USB devices! The strange thing about it was that the USB ports were not bad because all of my devices were still getting power to them. I could still charge my cell phone without a problem!
usb device not recognized
So I started with the normal fixing methods, including uninstalling the drivers for my devices and reinstalling them. That didn’t work! Next I tried System Restore thinking that maybe I had installed something and it caused a conflict with the USB system drivers. That didn’t work!
I read online that in order to fix this problem I should go to Device Manager and uninstall all of the devices under USB Controllers. Restarted the computer, reinstalled the USB drivers, but the problem STILL did not go away!
You may also see in Device Manager that the device shows up as an “Unknown Device”.
unknown usb device
So how did I finally fix the problem? Well, apparently it’s a super simple solution! No need to edit the registry, uninstall drivers, or anything of that sort.
Simply UNPLUG YOUR COMPUTER FROM THE POWER SUPPLY. Yes that’s it! Note that this does not mean just turning off your computer because modern computers don’t really turn off when you press the power button as the motherboard still gets power.
First to explain, the motherboard is where all of hardware of the computer is connected to, including the USB ports. Sometimes the motherboard needs to be “rebooted” also because something can go wrong, i.e. all your USB ports suddenly stop working. The small microprocessor on the motherboard will reload the drivers and your USB ports should be back to recognizing all devices!
So first turn off your computer using Shut Down or pressing the power button and then UNPLUG it from the wall outlet. Let it sit for about a minute and then plug it back in.
Hope this helps someone fix that pesky “USB device not recognized” Windows error!


You like the Post?  Then Please Share it...


How to Fix Upside Down Videos in VLC

0 comments

VLC will fix the upside down video and play it immediately in the media player. Moreover, with VLC, you can use two methods for resolving this glitch. The first one is through the Transform feature and the other one is through Geometry-Rotate.

To start, open the VLC program and click the Tools menu.
tools menu
Next, press Effects and Filters.
effects & filters
The default display is Audio Effects. Hit the Video Effects tab to proceed to the next step.
video effects
Under Video Effects, check the Transform checkbox.
rotate 180
For this illustration, because we want to resolve the upside down video, we will select Rotate by 180 degrees.
You also have an option to rotate the file by 90 or 270 degrees, or flip it horizontally or vertically.
rotate modes
You will see the result immediately. This is the original video.
original video
This is the resolved movie. After the fix, you can continue playing and watching the video.
rotated video
The other way of patching up upside down video using VLC is through the Geometry-Rotate feature.
To access this tool, you still have to click the same commands used in the first method. Go to Tools >Effects and Filters > Video Effects. Instead of going to Basic, browse to the Geometry tab.
Next, check the Rotate checkbox. In here, you can see the Angle needle. This needle will be used to rotate the video according to your preferred angle.
rotate angle
This is the default angle of the video when you enable Geometry’s Rotate feature.
rotate video angle
Move the needle downwards to rotate the upside down movie by 180 degrees.
correct angle
You can see the effect in real-time. This is the result file rotated by the Angle’s needle.
angle rotated
Remember though that VLC’s fix is not permanent. Once you close the file and play it again, you will still see the upside down video.


You like the Post?  Then Please Share it...


Friday, January 31, 2014

Free software to protect personal folders without Deleting and Reading

0 comments


Protected Folder

The Most Advanced and Easiest Folder Protection Tool


  • No Worries of Data Theft by Malicious Behavior
  • No Worries of Privacy Leaks on Shared Computer
  • Multiple Protection Levels for Different Needs
  • Super Easy to lock folder

Posted Image


What does
Protected Folder do?
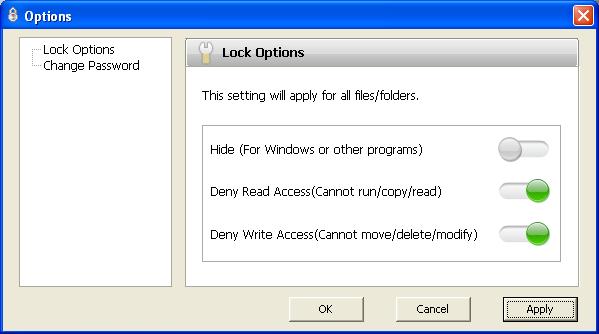
Protected Folder is a folder / file locker which protects user's privacy and important data from theft, loss or leaks. To lock folder and file, just drag and drop them into Protected Folder's safety box and you can hide and protect them from being viewed or modified. Protected Folder is an ideal folder locker if you are concerned with the security of you private or important data.


Posted Image


Download Latest Version Here


Thanks for coming by and taking your time to read this post :) I hope you have learnt something today and shared this. Now I'd love to hear from you. Got any views, thoughts and questions related to the post? I'm all ears here. Add your comment.


AutoGK (Auto Gordian Knot) 2.55 - DVD to AVI/DivX/XVid Ripper in very easy-to-use interface

0 comments


P


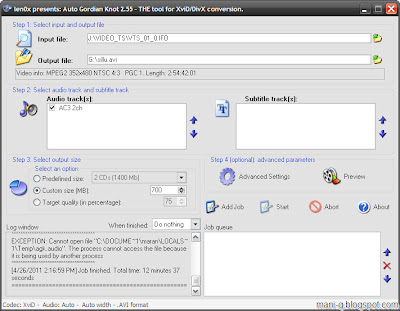
AutoGK includes everything you need to rip DVD to AVI/DivX/XVid in very easy-to-use interface. It also supports other MPEG2 sources, such as HDTV, DVB captures and transport streams.


AutoGK contains following codecs and tools

- VirtualDubMod 
- AviSynth & AviSynth Filters
- DGMPGDec
- VobSub
- XviD
- and Auto Gordian Knot (of course)


Features of AutoGK (Auto Gordian Knot):

- DVD, Mpeg2, transport streams (including multi-program ones) input sources
- XviD or DivX output formats
- AC3, DTS, PCM, MPA input audio tracks
- AC3, DTS, CBR MP3 or VBR MP3 output audio tracks
- two audio tracks in AVI
- external (vobsub) or internal (burnt-in) subtitles (with support of forced subs)
- HDTV input/output resolutions(upto 1920x***) and frame rates (50/60fps)
- automatic crop and resize based on compressibility of the source to achieve best results
- automatic detection of input source: PAL, NTSC, FILM, HYBRID
- automatic deinterlacer and IVTC
- automatic split into CD-sized chunks for main video and external subs


Changes in AutoGK 2.55 :

- Finally we're at a point when a stable version is ready!
- XviD bundled was still 1.3.0 somehow, which is updated to 1.2.1
- ColorMatrix filter updated


Download Here


Thanks for coming by and taking your time to read this post :) I hope you have learnt something today and shared this. Now I'd love to hear from you. Got any views, thoughts and questions related to the post? I'm all ears here. Add your comment.