Wednesday, January 22, 2014

How to Run Android Apps on a PC Using Bluestacks

0 comments


BlueStacks App Player is a versatile program that bridges the gap between mobile and desktop by allowing users to run their favorite Android apps on their Windows or Mac OS X devices. An innovative "Cloud Connect" feature allows you to push apps from your Android device to Bluestacks, and vice versa. First released to the public in 2011, the program has continued to grow, and is currently free for download in its current beta form. Want to get a taste of Android on your desktop? Here's how to set up BlueStacks, as well as a rundown of some of its controls and interesting features.

1. Installing BlueStacks

BlueStacks App Player is available for Windows and OSX computers, and is a quick, compact install to your boot drive (there's no option in the installer to go to a different drive or directory). The only choice you make during the install is whether to allow the program to make notifications, as well as the option to opt in to BlueStacks Spotlight, which holds daily app giveaways.

2. The Home Screen

Once installed, BlueStacks will boot up to its Home Screen, where you can access your installed apps, look up apps in the "Top Charts," search for apps, and access settings. You can use the mouse for basic touch controls here, with clicking and holding to simulate basic tap and swipe controls. From here, we'll need to do a bit more setup before you can get around to installing apps. You'll need to set up access to the Google Play store and associate a Google Account with BlueStacks.

3. Setting up the App Store

With BlueStacks installed, the first thing you'll want to do is associate a Google Account so that you can get onto the Google Play store and download apps. Go to "My Apps" and click on "1-Click Sync Setup," which will bring up a wizard interface that will guide you through the process. Basically, you'll need to either create a Google account, or sign in with your existing one.

4. Setting up BlueStacks Cloud Connect

An optional step for users with an Android smartphone or tablet is to set up BlueStacks Cloud Connect, an app that allows you to push apps from your Android device to BlueStacks, and vice versa. Download Cloud Connect for your Android device, and then go to the Settings button on BlueStacks and click on "Cloud Connect".
If you have an Android phone, input an email address as well as your phone number. You will then receive instructions via email and SMS on how to connect your phone to Bluestacks, push apps, and sync SMS.
If you're running an Android tablet, you instead just use an email address to synch BlueStacks with your device. After registering BlueStacks Cloud Connect, you should receive an email containing a PIN number, which you input into the Cloud Connect app.
You should now be able to push apps between your device and BlueStacks. You're essentially istalling the same app on your desktop and mobile device, without syncing app data (such as login credentials or game progress). Still, it's an easy way to copy apps from your device to BlueStacks, or vice versa.

5. Installing & Running Apps

If you're not going to sync apps to and from your Android device, you can just use the built in App Search to search for and install apps from Google Play, Amazon, or 1Mobile.
It may seem confusing at first, but BlueStacks won't let you get to its three built-in app markets directly. You'll need to go through the App Search button. Type in the name of the app you're looking for, and it will search 1Mobile, Amazon, and Google Play for matches, and give you the option to install apps from any of the above three stores.
Once you've accessed one of the three app stores, you can then navigate that store. Within Google Play, for instance, you can take advantage of the store's search and other features.
Once you return to the Home Screen, your newly installed app should be ready to run. BlueStacks can run an impressive variety of apps from social networking tools and multimedia apps to games. However, BlueStacks won't run everything, so expect a little trial and error for compatibility.

6. Controls & Settings

You should now have everything you need to install and run apps from BlueStacks, so we'll finish up with some extra notes on in-app controls, as well as settings. Unless you happen to be running a touchscreen rig or a Windows 8 tablet, you're going to need some way to approximate pinch to zoom, as well as tilt controls.
Pinch to Zoom: Control +, or Control -
Tilt Controls: 'Z' or 'X' can be used to simulate tilting a device left or right.
BlueStacks supports the use of gamepad controls for many apps, which will be a godsend for users looking to play Android games on a PC. Plug in your controller, and Bluestacks should inform you if a particular app supports a controller.
Finally, the Settings menu (gear icon) contains assorted system settings for language, keyboard settings, contacts and account management, and an app manager for uninstalling applications and setting their default sizes.
There's your quick visual tour of the BlueStacks App Player. It may not run every Android app perfectly, but BlueStacks puts you just a mouse click away from thousands of compelling choices.


You like the Post?  Then Please Share it...


HOW TO INSTALL ANDROID OPERATING SYSTEM ON COMPUTER ( WINDOWS, MAC, LINUX )

0 comments


Do you know you can Install Android Operating System on Computer or PC  (Windows, Mac, Linux). There are many methods available in the market to install android on computer. Today I am going to illustrate one of easiest method using which it can be done in no time. To make it clear,  this is how it will work-> User downloads a framework and Android operating system is installed over that framework. Framework which i am talking about is Virtual Machine from Oracle, Virtual Machine allows user to install multiple operating system on a single Operating System.
Since Virtual Machine is available for Windows, Mac, Linux and Solaris, Android is compatible with most of PC’s and Computer all around the world.


FOLLOW BELOW STEPS TO INSTALL ANDROID OS ON COMPUTER OR PC (WINDOWS, MAC, LINUX)

Installation process of different android version (ICS, Jelly bean) are all similar, only difference is the version of android you need to download from source.
  1. Download and install Virtual Machine on your computer, choose version depending upon your Operating System. for ex download VirtualBox 4.2.16 for Windows hosts for Windows Operating System.
  2. Download Android from below sources, I have tested using Android 4.0.4 but you can download and install other version like jelly bean.
3.  Extract Android 4.0.4 and double-click on VMLite-Android-v4.0.4.vbox and and click on start to install android on computer.It will take some time depending upon speed of your computer.
Install Android OS on PC or Computer (Windows, MAC, Linux)


NOTE: TO INSTALL ANDROID 4.2 OR ANDROID 4.3 ON COMPUTER  FOLLOW BELOW STEPS

  1. Open Virtualbox and Select New from menu, Enter credentials and select  ->Type : Linux,Version : Other Linux
  2. Click next and enter minimum 1 GB space on RAM, 1GB space for hard disk (either dynamic allocation or fixed) and click next.
  3. Now goto Virtual Device and select setting a box will appear now goto Storage->Storage Tree->Empty and in the attribute section on the right side select android 4.2 or 4.3 iso you have downloaded, and check  Live CD/DVD and click ok.
  4. Start Virtual Machine and Select Android-x86 on Hard Disk,  next screen create/modify partitions.
  5. Create New bootable partition and select write and select quit after writing.
  6. Now install android 4.x on  sda1 , type as ext3 and install grub.
  7. Remove ISO from VirtualBox and reboot Virtual Box.
  8. Now you can boot to android operating system.
Now its time to enjoy world’s best and amazing operating system on computer.


You like the Post?  Then Please Share it...


Sunday, January 19, 2014

How to Turn Computer Web Camera to Security Camera

0 comments


Posted ImageWhat is the Cammster?

Cammster is an alarm system for your house with additional features which works by a principle of the motion detector.
Cammster is created for those who don't want to leave apartment without supervision during holidays, business trips etc.
Cammster advantages are photographing and sms notifications with link to the photos.


How it works

Leaving apartment, you leave the turned on computer with the webcam connected to the Internet and the launched program.
If movement is detected, the program will photograph the place through the webcam and will save pictures to the selected storages. You will be notified by sms and email about it.
*If you have pets, you can adjust sensitivity of the program to avoid false alarms.


What can Cammster?

  • Motion detection
  • Save photos into the E-mail attachments
  • Save photos to the RapidShare
  • Save photos to the Dropbox
  • SMS alerts about detected motions
  • Running several detectors in different tabs or computers.
  • History of alerts

Activate it Here


Thanks for coming by and taking your time to read this post :) I hope you have learnt something today and shared this. Now I'd love to hear from you. Got any views, thoughts and questions related to the post? I'm all ears here. Add your comment.


HOW TO USE ANY SIM IN ANY DONGLE EVEN THOUGH IT SHOW INVALID SIM

1 comments

1. Insert SIM in Modem (Dongle).

2. Modem show invalid SIM, just ignore it and close modem     software.

3. Start NOKIA PC suite.

4. Goto nokia pc suite connect to internet option.

5. Go to Configure. Select your data card modem,and make all operator apn setting as like when we use nokia mobile connection.

6. Finish set up.

7. Now connect to internet through PC suite.

Done.

Now u can use your modem with the operator of your choice.


You like the Post?  Then Please Share it...


Thursday, January 16, 2014

New Android Interface

0 comments
Awesome apps that can change your old boring Android Interface.
 You have often wondered ,how you want to change your old android interface.
If you are bored of your old interface,check out the new apps that can change the look,experience on your device.


1. Aviate
     One of the recent launching app for android,its really a primarily launcher which replaces your default Android launcher app.It gives a lot new experience in its new pattern of home screens ,folders,notification bars and drawers.Its totally different from the default UI. The Aviate has a complete different approach, it keeps changing according to your usage (as well as your location and time during a day). Suppose you are travelling,this app can suggest you the music that suits for the location, the navigation apps and even foursquare(app which can tell you where you can go out to meet friends at the moment).The interesting feature of this app is that the launcher keeps learning as your usage increases which is really interesting.As we all know ,nothing is perfect, minor bugs have been detected which are needed to be cleared by the developers.Well you won't find any serious issues like crashes or lags.
                                             
                                                        Aviate is available on Google playstore. 
                                                    To download Aviate click on the link below.
                                                                     http://bit.ly/1cApGJr


2.Themer
       Well this one is really cool in its layout, homescreen(which are customizable).This is same as Aviate which is launcher app for the default android launcher. Themer is developed by MyColorScreen .Well this one is the one of the best app if wish to create(more specifically transform) your Android Smartphone's looks and layouts.Currently there are more than 55000 unique homescreens at themers for you to download(depends on the specification of the device).At first , you may find difficult in managing the  layouts and designs as every design and layout differ from one another,but if you starts understanding it,it is the best,amazing ,cool UI you can get.
                                   
Well this app is working for all android 4.1 smartphones(not sure about working in tablets,as it still in developing for big screens).
Themer is available on Google playstore.
  To download Themer click on the link below.

3. GO Launcher EX
      This is the most popular and downloaded launcher app for Android.It contains vast range of customizable themes,making it so popular, perhaps the most downloaded launcher app for Android Smartphones. The appreciative feature of this app is that is that you can customize your icons,wallpaper and lock-screen with lots of themes and patterns. And other important feature is that ,you can change the launcher app to default  Android app launcher easily.(It also contains Alienware theme)
GO launcher EX is available on Google playstore.
  To download GO Launcher EX click on the link below.


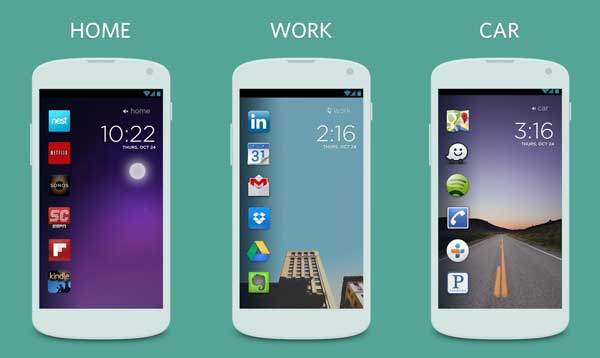
4.Cover
   Its just like Aviate, the app learns according to your usage and keeps updated with your location and the time of the day. Well it seems it is made for screen lock app if you use Android device(more specifically smartphones).The latest and most recently used apps are placed at the top in a clean looking screen. This launcher is good ,user friendly.This app is handy in checking the updates and needed downloads.

Cover is available on Google playstore.But in some regions ,it may not.
  To download Cover click on the link below.


5. MIUI MiHome Launcher
         MIUI MiHome Launcher is one of the most easy to use apps as it initially changes the looks of layout of your Android interface rather than completely replacing the design pattern.Another feature is it has its own lock screen, its own wallpaper ,icons and widgets.This app is developed by Xiaomi, a chinese smartphone and app maker.The launcher app can be used in Android devices using 2.3 and above. Many variety of customizable themes are available at Xiaomi's store.

                                            MIUI MiHome Launcher is available on google playstore
                                       To download  MIUI MiHome Launcher click on the link below.
                                                                    http://bit.ly/1hS2GKP


You like the Post?  Then Please Share it...