Tuesday, December 17, 2013

How to Transfer files between your Android device and PC using Wi-Fi

0 comments
Find out how to transfer files between your PC and Android tablet with the WiFi File Transfer application. 
You can transfer files from any machine (if it's on the same network). You can transfer from multiple machines and do so with the ease of a very well designed web-based interface.


Features

Here are some features that you'll find with WiFi File Transfer:
  • Upload or download multiple files at once
  • Upload entire folder structures (Google Chrome only)
  • Delete, rename, copy, zip, or unzip files
  • Password authentication
  • Shortcuts to photo, video, and music directories
  • Runs as a background service
  • View photos directly in your web browser
  • Autostart service when connected to home network (optional)
  • Access to external SD cards and USB storage devices
  • Supports hotspot mode

There are two version of the app: Free and Pro for $1.40 (USD). The only limitation of the free version is that you can't upload files larger than 5MB.
But you can Download WiFi File Transfer Pro for Free in our site.


Installation

As with any Android application, WiFi File Transfer can be installed with these simple steps:
  1. Open the Google Play Store
  2. Search for "wifi file" (no quotes)
  3. Tap on the WiFi File Transfer entry (or the Pro version if you know that you want to purchase the software)
  4. Tap on the Install button
  5. Tap Accept
Once the installation is complete, you'll find the application in your app drawer (you might also find a launcher on the home screen). Tap the icon to begin using the application.

Usage

As I already mentioned, you must first make sure your device is connected to the same wireless network as the desktop machine(s) you wish to transfer files to/from. Once you have that taken care of, open the WiFi File Transfer tool and tap the Start button (Figure A) to start the file transferring service. Figure A
WiFi File Transfer running on a Verizon-branded Samsung Galaxy Note.
Once you tap the Start button, you'll be given the IP address and port that will allow you to connect through your desktop browser. Point any browser to this address:port combination (if the browser is on the same network as the wireless device), and you'll see the following handy web interface (Figure B). Figure B
WiFi File Transfer from within the Google Chrome browser.
The interface is set up with four main sections:
  • File browser: Where you can navigate your device file structure and download files
  • Media gallery: Where you can view a thumbnail gallery of your device's images
  • Device information: Get storage information of the device at a glance
  • Transfer files: Where you can transfer files and folders (Chrome only) to the device
To transfer a file to your device, follow these steps:
  1. Point your browser to the WiFi File Transfer web page
  2. Click the Select Files button under Transfer files to device
  3. In the file manager, locate the file to be uploaded and click Open
  4. Click Start upload from the main window
  5. Allow the upload to complete
To download files from your device, do the following:
  1. In the file browser, navigate to the location of the file
  2. Select the file(s) to be downloaded (Figure C)
  3. Click the Download button
  4. Select to download the files individually or as a zipped archive
  5. Allow the download to complete
Figure C
You can download as many files as you need.
If you want to download media, you can quickly download from the thumbnail gallery. Here's how:
  1. Click on the Media gallery tab
  2. Navigate to the file you want to download
  3. Click on the Download link (Figure D)
Figure D
You can also just view the file in the gallery by clicking the thumbnail image or the file name.

Password protection

Once your Android tablet is on the network, anyone who knows the password could add or remove files to that tablet -- but not if you password protect the WiFi File Transfer application. To do this, follow these steps:
  1. Open the application
  2. Tap the Settings button
  3. Tap Access Password
  4. Enter a password to be used
  5. Tap OK
Now, when anyone points their browser to that address:port, they'll have to enter the password to gain access.
If you're looking for one of the best ways to transfer files to and from your Android tablet, look no further than WiFi File Transfer. Not only does it allow you to easily gain access to the files/folders on your tablet, it offers the simplicity of a web browser for the process of transferring that information.


Thanks for coming by and taking your time to read this post :) I hope you have learnt something today and shared this. Now I'd love to hear from you. Got any views, thoughts and questions related to the post? I'm all ears here. Add your comment.

Monday, December 16, 2013

How to Avoid Phishing Attacks and Protect your Passwords Online

0 comments
Many times we receive an email saying" you have won 10000$!" or you receive a text message on your phone which says " your number won in the lucky draw contest!" Many of us believe it and so we do everything they ask us to do, like giving away passwords and bank account numbers. But by the time we get to know that our passwords have been hacked, it is too late. This serious problem is termed as "phishing" which cyber criminals use to attack common  users.

What is Phishing?

phishing
Phishing is a technique used by the cyber criminals who try to steal your important and private information by pretending to be someone or something you trust. For example, you get an email which seems to have been sent by your bank  asking for your account details, but in fact it is indeed sent by a phishing expert. Though the email seems very real, it is actually sent by a cyber criminal to steal your account passwords. Phishing techniques have become extremely dangerous and sophisticated these days, since they accurately replicate the legitimate trusted source. For example, they will have a real logo, will use the same font and will seem to come from a real email address.


Typical forms of phishing attacks:

1.Account upgrade, system maintenance, software crash or some other mundane reason.
2. Sms text message that seems as if your bank or relative or friend is trying to get in touch with you.
3. Instant message asking you for confidential information.
4.Private message on Facebook containing a link that may take you to a page that looks like a log-in screen for facebook, but actually is a fake log-in screen.

fb+phish

Here in the picture you can see a Facebook phishing attack. Check the URL bar, it is not the Facebook.com

There are a few simple things you can keep in mind in order to avoid the phishing attacks:
  • Your bank or credit card company shall never ask for your password under any circumstances.
  •  If the email you have received contains a link, do not blindly click on it. It can be a fake link which may lead you to a fake log-in screen or executes some other phishing attack. Before you click on the link, you can find out where it is going to take you by holding your mouse over it for a few seconds and looking at the status bar of your browser.Below one is example of phishing.

PayPalPhishing.

  • You may receive an email with a link which looks real. Even if you hover your mouse over it, it replicates a trusted website. For example, Look at the following web address- https://www.facebook.com@www.abs123.com . At first glance this may look like the facebook link, but in reality it will direct you to a completely different address which begins separately after the @sign.

facebook-phishing-email

  • Always check for "https" in the url address bar of your browser, before you enter any confidential information on website. Typically, only trust worthy websites use "https" and phishing websites use "http".
  • Make sure that you read the url address properly. Watch out for websites with spellings that are similar to the actual website. "online.citibenk.com" instead of "online.citybank.com". Cyber criminals are known to register website domain names with a spelling similar to a trusted website.
  • A simple way to detect a phishing email is, you can carefully look for your full name mentioned in the email. Usually, the cyber criminal doesn't know your full name and may contact you by referring you with Sir, or your email address.
  • Most popular browsers like google chromemozilla firefox maintain a list of known phishing webistes and warn you when you are about to visit any phishing website that appears in their database.

warning+screen

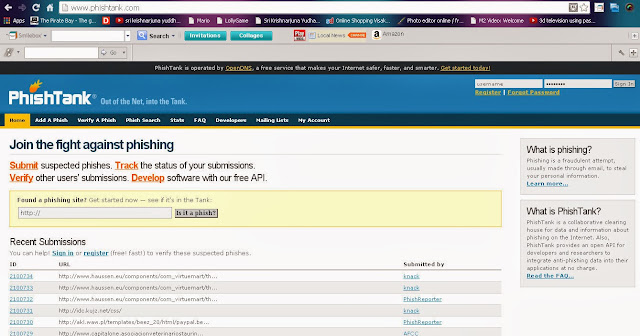
  • If you receive a link and are not sure whether it is safe to click on it or not, you can however check if it is a phishing attach by submitting the website address to a site called PhishTank. This website maintains a comprehensive list of known phishing websites and provides a quick review if the website is trust worthy or not.

phishtankwebpage
  • As you can see, the webpage of Phish Tank provides a bar, to specify any suspected link in it and checks for it. If you sign in or register with the website, you can submit any phishing link to the website and soon it updates the fake link. 
sample+url
  • Here, I have given a link in the bar, to check if it s a phishing attack. We click on the IS IT A PHISH button.

phish+detected
  • Phishtank has detected the link as a phish. It also provides a rating for 100%. If it is more than 50% you should not enter into the link.


Other solutions:

There are commercial anti-phishing software tools available that provides you protection against phishing attacks. For example McAfee's SiteAdvisor Live is a product that allows you to identify and protect yourself from risky websites. You can buy it online from its website.
mcafee
Most importantly, if you have never opened an account with a particular bank and they email you, then it probably is a phishing attack. No matter how tempting their offer might be, do not click on any of their links.

Just keep these simple steps in mind and so you can avoid phishing attacks.


You like the Post?  Then Please Share it...


How To Use Facebook For Free Without Internet

0 comments
facebook+for+mobile
FACEBOOK a revolution in socail networking sites. now-a-days everyone use facebook. it not possiblle for all of them to leave there work and sit before computer.So many of them are accessing facebook through their mobiles.
And another problem arrises here not all people will have smart phones and internet connection for there mobile.


For this I found a trick to access facebook from any mobile with out internet for free.


FACEBOOK Without Internet For Any Mobile

  • from any kind of phone,[need not be specifically a smart phone] dail *325#
  • As soon as you call for the above number there will be a new screen alert ENTER FACEBOOK USERNAME
  • then enter you facebook user name and password
  • Now its shows the following options in your mobile    
             1. Message
             2. News Feed
             3. Update Status
             4. Post On Wall
             5.Friend Request
             6.Notifications

             *.account settings
click the answer button and enter your choice.
You can update your status as many times as you want its free.

Tips: If you want to add your friend on facebook then dail *325* mobile number#


You like the Post?  Then Please Share it...


How to Reveal Hidden Passwords (Asterisks) in Web Browsers

0 comments

Remember the situation, signing into your account with just a single click because browser is saving all your passwords for you. We know this is convenient but since you’re not typing your passwords any-more, eventually you’ll forget your password in a few days.  For security reasons, the password field in all browsers is masked with “asterisks” which won’t allow any third person (even you) to read the original typed password. But, what if you want to reveal the string behind the asterisks? There is actually few workaround for revealing the original passwords behind the asterisk and over the entire course of this article we’ll be discussing some known ways to reveal the characters behind the asterisks in different browsers.


Reveal Passwords Behind Asterisks or Dots in Different Web Browsers:

Google Chrome:

Starting off with Google chrome, the easiest way to reveal the original passwords behind the asterisk is using inbuilt Inspect element feature in the browser.

  • You just need to right click on the password field in the browser where you will get an option "Inspect Element". 
  • After clicking on it, "Web Inspector" will open out and there you can see some code which is basically Html code and you just need to replace the "password" word with "text" word and it will reveal the words behind the asterisks.


There’s another way using JavaScript which is quite quick and easy as compared to above method. Just open a site that allows users to login and after typing the password, just enter the following JavaScript code in the address bar.
Javascript: alert(document.getElementById('Passwd').value);
After entering the above code in the address bar, press enter and it will pop up a window with your password written on it.
reveal+passwords+with+javascript+in+google+chrome


Mozilla Firefox:

The Next most common browser is "Mozilla Firefox".
  • The chrome's "Web Inspector" trick is also applicable in Firefox.
  •  Open a site that asks for login (like Facebook), right click on the password field in the browser where you will get an option "Inspect Element". After clicking on it, "Web Inspector" will open out and there you can see some code which is basically Html code and you just need to replace the "password" word with "text" word and it will reveal the words behind the asterisks as shown in screenshot below.
inspect+element+in+mozilla+firefox+for+facebook
Apart from this, there’s another way which is quite quick and easy as compared to above method. For that you’ve to create a bookmark with the following JavaScript code as URL in it.
javascript:(function(){var s,F,j,f,i;s="";F=document.forms;for(j=0;j<F.length;++j){f=F[j];for(i=0;i<f.length;++i){if(f[i].type.toLowerCase()=="password")s+=f[i].value+"\n";}}if(s)alert("Password is:\n\n"+s);else alert("No passwords");})();
After saving this as a bookmark, open a site that allows users to login and after typing the password, open the saved bookmark by clicking on it and it will pop up a window with your password written on it.
revealing+passwords+behind+asteriks+in+mozilla+firefox

Opera:

Next comes the "Opera" in that you can use "Dragonfly", which is an in built tool, to reveal the words behind the asterisks just like chrome's "Web Inspector". Open a site that asks for login (like
Facebook), right click on the password field in the browser and select "Inspect Element" option. After clicking on it, "Dragon Fly" will open out and you’ll see some code which is basically Html code and you just need to replace the "password" word with "text" word and it will reveal the words behind the asterisks as shown in screen shot below.
inspect+element+in+opera

Internet Explorer:

In the same manner you can apply this trick on Internet explorer. First of all open any site (Gmail in our case) that allows user login. Now for bringing out “developer tools” press the f12key. A new window will be opened and press Ctrl+B to enable selection of elements. After that go to login page and select the password field, doing this will take you to the password field’s code in developer window (highlighted by yellow). Now, you just need to replace the "password" word with "text" word and it will remove the asterisk mask in the password field, see screenshot below.
inspect+element+for+internet+explorer
Apart from this, there’s another way which is quite quick and easy as compared to above method. Just open a site that allows users to login and after typing the password, just enter the following JavaScript code in the address bar.
alert(document.getElementById('Passwd').value);
After entering the above code in the address bar, press enter and it will pop up a window with your password written on it. (See pic below)
reveal+hidden+passwords+in+internet+explorer+with+javascript


Wrap Up:

Although there are so many tools out there to help you in revealing the words behind the asterisks and to get the saved passwords with in a browser, you still need to keep your system safe and protected by using "Antivirus" plus "Firewall" to avoid stealing of these passwords by someone who have access to your system. If you can use these tools to reveal your saved passwords then others can also use the same ways to get information of yours.


You like the Post?  Then Please Share it...


Abbreviation of Major IT Companies

0 comments
GOOGLE :- Global Organisation Of Oriented Group Language of Earth

APPLE:- Asian Passenger Payload Experiment

HP :- Hewlett-Packard

IBM:- International Business Machines Corporation

HCL:-Hindustan Computer Limited

WIPRO:- Western India Product Limited

GE:-General Electronics

INFOSYS:-Information System

TCS:- Tata Consultancy Services

AOL:- American Online

BPL:- British Process Laboratory

INTEL:- Integrated Electronics

CISCO:- Computer Information System Company

DELL:- michael DELL

SONY:-Sound Of New York

AMD:- Advance micro devices

LENOVO:- LE(Legend),NOVO(New)

COMPAQ:- Compatibility And Quality


You like the Post?  Then Please Share it...


Sunday, December 15, 2013

3 Easy Ways To Clear CMOS

0 comments
Clearing the CMOS on your motherboard will reset your BIOS settings to their factory defaults. After clearing the CMOS, you'll need to access the BIOS setup utility and reconfigure your hardware settings.
You might need to clear the CMOS for several reasons but usually you'll want to clear the CMOS to help troubleshoot or solve certain PC problems like hardware compatibility issues.
Here are 3 different ways to clear the CMOS. Any one method is as good as any other but you may find one of them easier or whatever problem you might be having may restrict you to clearing the CMOS in a particular way.


Clear the CMOS with the "Factory Defaults" BIOS Option Menu


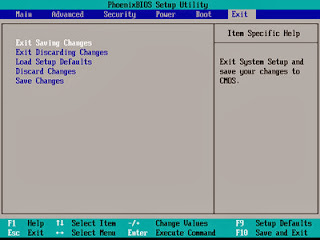
The easiest way to clear the CMOS is to enter the BIOS setup utility and choose to "Reset BIOS Settings" to their factory default levels.
The exact menu option in your motherboard's BIOS may differ but look for phrases like reset to defaultfactory defaultclear BIOSload setup defaults, etc. This option is usually located at near the bottom/end of your BIOS options.
Note: The directions I've linked to here are how to access your BIOS utility but do not specifically demonstrate how to clear the CMOS in your BIOS utility. It should be easy enough, however, as long as you can find that "reset" option.


Clear the CMOS Using the Motherboard Jumper


Another way to clear the CMOS is to short the "CLEAR CMOS" jumper on your motherboard, assuming you have one (most motherboards do).
Open your computer and look around your motherboard for a jumper labeled like this. These jumpers are usually located near the BIOS chip itself or near the CMOS battery.


Clear the CMOS by Reseating the CMOS Battery


Yet another way to clear the CMOS is to reseat the CMOS battery. By removing and then reinstalling the CMOS battery, you remove the source of power that saves your computer's BIOS settings.
If you can't access BIOS and also can't locate the clear CMOS jumper, clearing the CMOS this way should do the trick.


You like the Post?  Then Please Share it...


How To Create Undeletable And Unrenamable Folders

0 comments
1. Go to Start and then Click on Run -Type cmd & hit enter (To open Command Prompt ).

2. Remember you cannot create Undeletable & unrenamable folder in your root directory (i.e. where the windows is installed) That means you can't make this kind of folder in C: drive if you installed windows on C:

3. Type D: or E: and hit enter

4. Type md con\ and hit enter (md - make directory)

5. You may use other words such as aux, lpt1, lpt2, lpt3 up to lpt9 instead of con in above step.

6. Open that directory, you will see the folder created of name con.

7. Try to delete that folder or rename that folder windows will show the error message.


Now the question is how to delete it when you really need to do?

1. Open Command Prompt

2. Type D: ( if u created this type of folder in D: drive) & hit enter Type rd con\ (rd - remove directory)

3. Open that directory and the folder will not appear because it is removed.


  • You may know this before..this is for those who aren't aware of this trick :))


You like the Post?  Then Please Share it...